This is a cross-platform Kendryte K230 chip firmware flashing tool written in Python. It provides command-line tools (CLI), graphical user interface (GUI), and programmable Python API for flashing firmware to K230 devices via USB.
This project aims to provide K230 chip users with a feature-rich, high-performance, cross-platform, and easily extensible firmware flashing tool.
- Device Discovery: List all currently connected K230 USB devices and their paths.
- Multiple Media Types: Support flashing to different storage media like
EMMC,SDCARD,SPI_NAND,SPI_NOR, and automatically select corresponding loaders. - Flexible Flashing Methods:
- Support flashing complete
.kdimgfirmware packages. - Support
.kdimgaddress command-line override. - Support flashing multiple independent
.imgfiles to specified memory addresses. - Support automatic extraction and flashing of compressed image files (gz, tgz, zip).
- Support flashing complete
- Progress and Speed Display: Provide real-time progress bars displayed during flashing.
- Cross-platform: Based on Python and
pyusb, runs on Windows, Linux, macOS. - Multiple Usage Methods:
- Command-line Tool: Provides simple and easy-to-use command-line interface, suitable for terminal users and automation scripts.
- Python Library: Can be imported as a third-party library into your own Python applications to implement customized flashing logic.
- GUI Tool: Integrated
K230_flash_GUItool with source code for user reference and customization.
Before using k230-flash, please ensure that the K230 device is in flashing mode and the operating system has properly installed USB drivers.
First, hold down the boot button on the K230 device, then insert the USB cable to connect the K230 device to the computer. For Windows, you will see K230 USB Boot Device displayed under Universal Serial Bus devices in Device Manager, which indicates that K230 is in flashing mode and ready for subsequent operations.
When using for the first time, you may need to install WinUSB driver for the K230 device. It's recommended to use the Zadig tool:
- Download and run Zadig (no installation required).
- Check Options → List All Devices in the menu.
- Select
K230 USB Boot Devicefrom the dropdown list (or shown asUnknown Device, Vendor ID:29f1, Product ID:0230). - Select WinUSB driver on the right side.
- Click Install Driver and wait for completion.
After completion, Windows will be able to recognize the device, and the k230-flash tool can be used normally.
Linux has built-in usbfs/libusb drivers by default, usually no additional installation is required.
But you need to configure udev rules for non-root users, otherwise you may need to use sudo to execute commands.
- Create rule file
/etc/udev/rules.d/99-k230.rules:
SUBSYSTEM=="usb", ATTRS{idVendor}=="29f1", ATTRS{idProduct}=="0230", MODE="0666"- Apply rules:
sudo udevadm control --reload-rules
sudo udevadm trigger- Unplug and reinsert the K230 device.
After completion, regular users can run k230-flash directly without sudo.
macOS comes with libusb drivers built-in, usually no additional operations are required.
If permission issues occur, try using sudo to run, or ensure the latest libusb is installed via brew:
brew install libusbInstall from PyPI:
pip install k230-flashEnsure the K230 device is connected to the computer via USB, then run the following command to check if the device is properly recognized:
k230-flash --list-devicesIf the device is connected, you will see output similar to the following:
[
    {
        "bus": 1,
        "address": 5,
        "port_path": "1-5.1",
        "vid": 10737,
        "pid": 560
    }
]The tool supports three flashing modes.
This is the simplest mode. Just pass the .kdimg file as a parameter.
k230-flash -m SDCARD /path/to/your/firmware.kdimgYou can specify a series of [address, file path] pairs to flash different .img files to different locations on the media.
# Format: k230-flash [address1] [file1] [address2] [file2] ...
k230-flash -m SDCARD 0x000000 uboot.img 0x400000 rtt.imgUse --kdimg-select to write just some of the partitions in a .kdimg, leaving the rest of the device untouched. Handy for updating only U-Boot, and much faster than rewriting the whole package.
k230-flash -m SDCARD firmware.kdimg --kdimg-select uboot_spl_a uboot_aThe
.img/.kdimgyou pass may also be a.zip/.gz/.tar.gz/.tgzarchive — it is extracted automatically and the first image inside is used.
| Option | Default | Description |
|---|---|---|
-l, --list-devices |
— | List connected K230 devices and exit |
-d, --device-path |
first device found | USB port path (e.g. 1-5.3.2). When given, the tool waits for that device to appear |
-m, --media-type |
EMMC |
Target media: EMMC / SDCARD / SPI_NAND / SPI_NOR / OTP. Case, separators and abbreviations are accepted — spi-nand, spinand, nand all mean SPI_NAND; sd means SDCARD. OTP needs -lf, see note below |
--kdimg-select |
— | Flash only the named partitions from a .kdimg (accepts several) |
-lf, --loader-file |
built-in loader | Path to a custom loader binary |
-la, --loader-address |
0x80360000 |
Loader load address |
--auto-reboot |
off | Reboot the device once flashing completes |
--device-timeout |
300 |
With -d, how long to wait for the device to appear (seconds) |
--device-retry-interval |
1 |
Polling interval while waiting for the device (seconds) |
--log-level |
INFO |
DEBUG / INFO / WARNING / ERROR / CRITICAL |
Common examples:
# Pick a specific board when several are connected
k230-flash -d "1-5" firmware.kdimg

# Flash to SPI NOR (the matching loader is selected automatically)
k230-flash --media-type SPI_NOR firmware.kdimg

# Use a custom loader
k230-flash --loader-file my_loader.bin --loader-address 0x80360000 firmware.kdimg

# Verbose logging when troubleshooting
k230-flash --log-level DEBUG -m SDCARD firmware.kdimg
The package is also runnable without installing an entry point:
python -m k230_flash --list-devicesThe tool is meant to be scriptable, so failures are reported through the exit code rather than only in the log:
| Code | Meaning |
|---|---|
0 |
Flash completed successfully |
1 |
The flash failed (device not found, wrong media, image too large, device reported a write error, …) |
2 |
The command line was rejected (bad option, missing file, unknown media type) |
130 |
Interrupted with Ctrl-C |
Arguments are validated before the tool starts waiting for a device, so a mistyped path or media type fails immediately instead of after the device timeout. Failures print a single-line reason rather than a Python traceback.
-m is matched on the separator-free, upper-case form of what you type, so
case and -/_/space differences never matter. On top of that a few
abbreviations are accepted:
| Canonical | Also accepted |
|---|---|
EMMC |
emmc |
SDCARD |
sdcard, sd |
SPI_NAND |
spi-nand, spinand, spi nand, nand |
SPI_NOR |
spi-nor, spinor, spi nor, nor |
OTP |
otp |
MMC is deliberately not accepted. eMMC and SD share a loader but send
different probe bytes, so either guess would be wrong half the time and fail on
the board with a confusing "no suitable device"; you get
did you mean EMMC? instead. Anything unrecognised is still rejected, with a
suggestion where one is close enough.
The same normalisation is used by the CLI, the library API and the burners, so
k230-flash -m nand and flash_kdimg(media_type="nand") cannot disagree.
OTP is a valid target for a loader that is already running, but no OTP loader
ships with the tool, so it cannot be reached from BootROM with -m OTP alone —
pass -lf/--loader-file with a loader that supports it.
Knowing the flow makes the logs and any errors much easier to read — flashing runs in two stages:
- The device powers up in flashing mode running the chip's built-in BootROM, which can only receive a small piece of code and cannot access storage media on its own.
- The tool pushes a loader (a trimmed-down U-Boot) matching your target media into chip memory and starts it.
- Starting the loader makes the device re-enumerate on USB. The tool waits for this and re-detects the device automatically — typically under a second, no user action needed.
- Through the loader, the tool probes the media, reads its capacity, and writes the firmware while showing live progress.
- With
--auto-reboot, the device restarts into normal boot once writing finishes.
So a log line about waiting for the device to switch to U-Boot mode is expected. If it stalls at media probing (the error suggests checking -m), the media type usually doesn't match the actual hardware, or the media isn't seated properly.
You can easily integrate the functionality of this tool into your own Python scripts.
import sys
from loguru import logger
from k230_flash import flash_kdimg, flash_addr_file_pairs, list_devices

# Configure logging to see detailed output. The library never reconfigures
# logging itself, so this is the only place log levels are decided.
logger.remove()
logger.add(sys.stderr, level="INFO")

def main():
    try:
        # List devices
        print("Connected devices:")
        print(list_devices())

        # Flash .kdimg file
        logger.info("Flashing kdimg file...")
        flash_kdimg(
            kdimg_file="/path/to/your/firmware.kdimg",
            media_type="EMMC",
            auto_reboot=True
        )
        logger.info("kdimg flash completed.")

        # Flash independent .img files
        logger.info("Flashing individual image files...")
        image_pairs = [
            (0x000000, "/path/to/uboot.img"),
            (0x400000, "/path/to/rtt.img")
        ]
        flash_addr_file_pairs(
            addr_filename_pairs=image_pairs,
            media_type="SDCARD"
        )
        logger.info("Image files flash completed.")

    except Exception as e:
        logger.error(f"An error occurred: {e}")

if __name__ == "__main__":
    main()
Notes on the library API:
- Paths may be
strorpathlib.Path; both are accepted everywhere. - Arguments are validated before any hardware is touched — an unknown
media_type, a missing file or an emptyaddr_filename_pairsraises immediately rather than after the loader has been pushed to the board. list_devices()returns pre-serialised JSON because the CLI prints it verbatim. Usek230_flash.api.find_devices()to get a list of dicts instead.- The
log_levelargument these functions used to accept never had any effect and is deprecated; configure loguru yourself as shown above.
In addition to the command-line tool and Python library, this project also provides a feature-complete graphical user interface tool K230 Flash GUI, allowing users to perform firmware flashing operations through an intuitive interface.
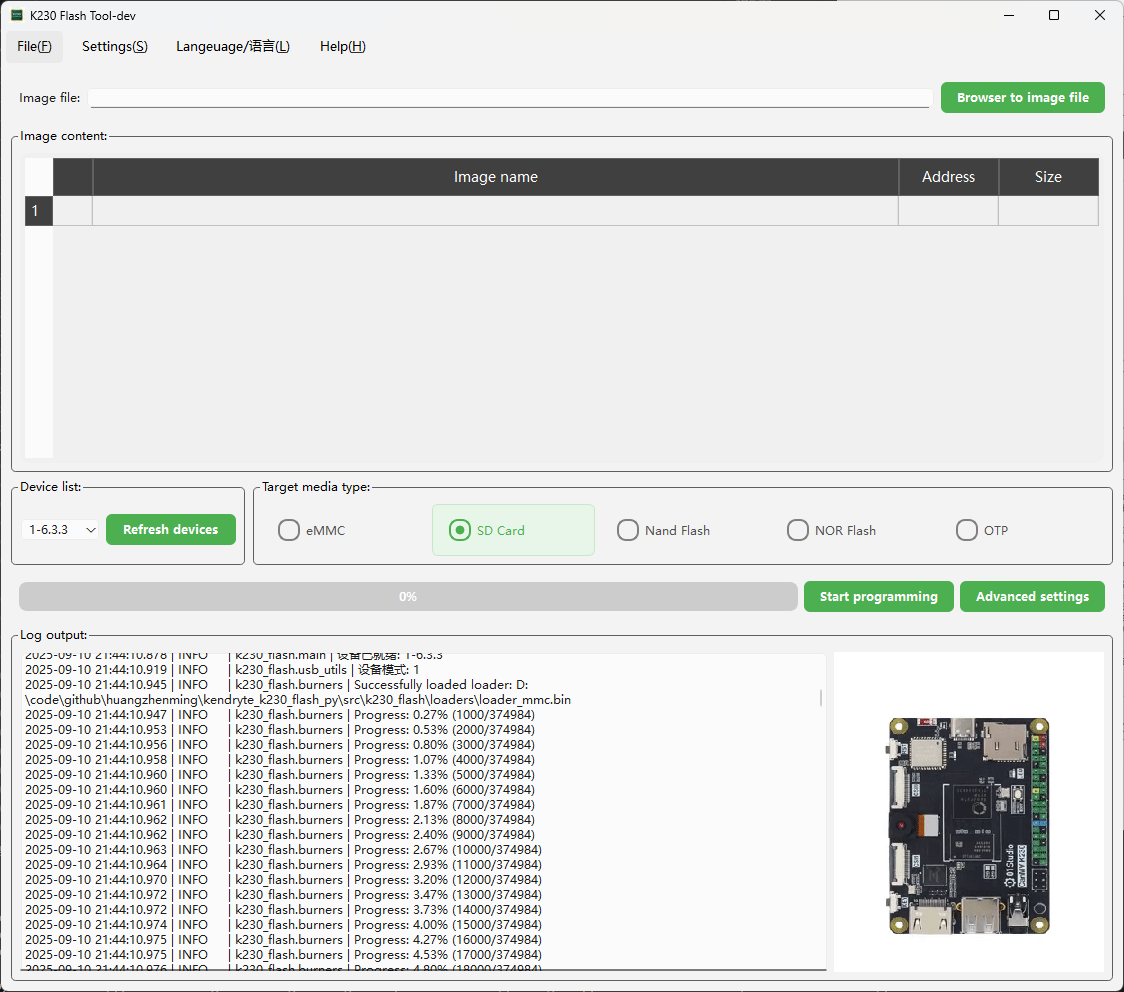
You can download the latest version of pre-compiled executable files from the GitHub Releases page. After downloading, run directly without installing Python environment.
On Linux the GUI ships as a single .AppImage; make it executable and run it:
chmod +x k230_flash_gui-linux-x86_64-*.AppImage
./k230_flash_gui-linux-x86_64-*.AppImage
It needs FUSE to mount itself, which every desktop install has (fuse3; note
that libfuse2 is not required). On a headless server, in a container, or
anywhere mounting is not permitted, use the CLI instead — pip install k230-flash — which is the better fit for those environments anyway.
For detailed usage instructions of the GUI tool, please refer to K230 Flash GUI User Manual.
Contributions to this project are welcome!
.
├── src/                          # Source code root directory
│   ├── k230_flash/              # Core flashing library
│ └── gui/ # Graphical interface tool./build.sh is the single entry point; it mirrors what the release workflow
does, so you do not have to remember three sets of commands.
./build.sh wheel            # sdist + wheel        -> dist/
./build.sh gui --venv       # GUI bundle           -> src/gui/dist/k230_flash_gui/
./build.sh gui --appimage   # Linux AppImage       -> dist/   (Docker, like CI)
./build.sh all              # wheel + GUI
./build.sh clean            # remove build artefacts
./build.sh --help
By default it only reports missing dependencies; add --install-deps to let it
install them.
Use --venv for GUI builds. PyInstaller bundles whatever Qt it can see in
the environment, so if your interpreter has a second Qt beside PySide6 — a
conda base with PyQt6 and qt6-main does — you get a bundle whose Qt
libraries and Qt plugins are different versions. It builds without complaint and
then refuses to start:
qt.core.plugin.factoryloader: Ignoring QPA plugin due to mismatching Qt versions
This application failed to start because no Qt platform plugin could be initialized.
--venv builds against requirements.txt alone in .build-venv/. On one conda
box that was the difference between a 1.2 GB bundle that would not start (400 MB
of it Intel MKL, dragged in via numpy) and a working 221 MB one. build.sh
warns when it spots a second Qt, and again if the finished bundle is suspiciously
large.
The AppImage is built inside docker/Dockerfile.ubuntu2204 rather than natively
on purpose: it has to link against an older glibc than a current dev box has, or
it will not start on the distributions it targets.
- Fork this repository.
- Create a new feature branch (
git checkout -b feature/AmazingFeature). - Commit your changes (
git commit -m 'Add some AmazingFeature'). - Push the branch to your Fork (
git push origin feature/AmazingFeature). - Create a Pull Request.
It's recommended to use black or ruff format to format your code.
This project is licensed under the MIT License. See the LICENSE file for details.